Ditching the salon for a DIY bleaching session? You’re braver than you think! And trust me, with the right knowledge, products, and a sprinkle of patience, you can indeed achieve that salon-finish right in the comfort of your home. Let’s dive into the world of hair bleaching and demystify the process, step by step.
Bleaching isn’t just changing your hair shade; it’s a science. Rather than adding a fresh hue like when you dye your hair, bleaching is all about lightening by removing your hair’s natural pigment. Dreaming of rocking that sultry blonde look, fancying a fiery redhead appearance, or maybe teasing with those trendy pastel shades? Well, before you play with colours, you must first master the art of bleaching.
And here’s the good news: achieving that blonde bombshell or vibrant pastel look isn’t rocket science. With the right at-home bleaching toolkit, you’re well on your way. So, buckle up as we unveil the secrets to effective at-home hair bleaching. Let’s embark on this journey!
Nurturing Before Lightening
Think of bleach as an intense workout for your hair. Just as you wouldn’t hit the gym without warming up, you shouldn’t bleach without ensuring your hair’s in tip-top condition. Bleach operates by penetrating your hair shaft, targeting and oxidising those melanin granules that bestow upon your hair its distinctive shade. But this process is intense and can be a tad aggressive.
Is your hair feeling a bit dry, brittle, or showing signs of damage? Pump the brakes on the bleaching for a moment. Allow a good one to two months for your hair to recover its strength. During this interlude, pamper your tresses. Start nurturing and moisturising them at least a fortnight before the D-day (or should we say, B-day for Bleach-day?).
Prepping Your Tresses for the Bleach Leap
When it comes to bleaching, preparation is half the battle won. Before you dive headfirst into the bleaching pool, take a moment to properly prep and pamper your locks. Here’s your go-to guide:
Embrace Your Natural State
Think of chemicals as your hair’s arch-nemesis. Over time, they weaken your hair strands, making them susceptible to breakage during bleaching. Aim for healthy, virgin hair – untouched by chemicals, dyes or treatments. If you’ve recently coloured or treated your hair, give it a three-month breather. Remember, bleach thrives on authenticity. The closer your hair is to its natural state, the better and safer the results.
Hit Pause on Heated Styling
Bid adieu to heated tools, at least temporarily. Also, scan the ingredient list on your shampoos and hair products. Avoid those sneaky sulfates and drying alcohols. They sap the essential moisture, making your hair more vulnerable during the bleaching ordeal.
Condition Like It’s Going Out of Style
Begin a conditioning marathon at least two weeks before your bleaching day. Swap your regular store-bought conditioners for indulgent deep conditioning masks. Whisk them up at home with luscious ingredients like coconut oil, ripe bananas, avocados, olive oil, and a splash of egg. Remember, always oil before shampooing. This little trick ensures the shampoo doesn’t strip your hair of its natural oils, preserving its silkiness and shine.
Coconut Oil: Your Hair’s Guardian Angel
The night before your bleaching adventure, let your hair soak in the goodness of coconut oil. Not only does it lock in moisture, but it also acts as a shield against the harshness of the bleach, ensuring your hair remains soft and hydrated. And fear not, it doesn’t hamper the effectiveness of the bleach.
While bleaching can certainly up your hair game, it’s vital to be aware of its potential repercussions. As with all beauty treatments, proceed with caution and awareness.
Bleaching and Its Aftereffects: Knowing When to Seek Expert Advice
Bleaching, though a common hair treatment, uses potent chemicals. The duo at the heart of the process: an alkaline agent (typically ammonium hydroxide) and an oxidising hero (usually hydrogen peroxide). Their task? To navigate through your hair shaft, dismantle the natural colour and fragment the melanin present. While this results in the coveted lighter shade, it does come with its baggage. From scalp burns and hair strands becoming more porous, to a substantial loss of hair protein, potential hair damage due to reduced hair porosity, and skin irritations – the side effects can be myriad.
Interestingly, persulfate salts, often found in bleaching powders, have been linked with skin conditions. For instance, a particular study threw light on its effects on hairdressers, where hand eczema emerged as a recurrent issue. Amongst 565 surveyed hairdressers, a significant 20.3% experienced hand eczema within a year, and alarmingly, a whopping 38.2% faced it at some point in their career.
Gathering Your Bleaching Arsenal
Bleach Powder:
Quality over everything! Opting for a top-notch bleach powder that aligns with your hair type is non-negotiable. Brands like Wella, Blondor, Matrix, or Salon Care have earned their reputation in the bleaching world. And remember, never, ever, use skin bleach on your hair – that’s a recipe for disaster! Blue or purple bleaches are popular choices to counteract those unwanted brassy tones.
Developer/Peroxide:
Think of this as the catalyst to your bleach powder. It sets the stage for the bleach to work its magic, lightening your locks. Peroxide volumes range from 10, 20, 30, to 40, signalling its strength.
Here’s a brief on picking your ideal volume based on hair shades (with 1 being a deep black and 10 a pale blonde):
Vol 10: Not for the dark-haired brigade. Best for gentle fading of already dyed hair or elevating a shade or two on lighter hair.
Vol 20: Tailored for those with light brown hair, it’s apt if you’re aiming for a subtle lift. It lightens around 2-3 shades.
Vol 30: Offering a lift of 3-4 shades, it’s your go-to for achieving that light blonde hue. But caution: it’s strong and can irritate sensitive skin. Always ensure minimal contact with skin and scalp.
Vol 40: The most potent in the lot, it offers a significant lift but can be harsh. Limit its interaction with your hair to 10-15 minutes to avoid unwarranted damage.
Stay informed, be patient, and always prioritise your hair’s health. Happy bleaching!
Essential Tools for Your Home-Bleaching Journey
Before you embark on your DIY hair bleaching adventure, ensure you have the following tools to hand:
- Tinting Brush: Essential for precise application.
- Clips: These will help in sectioning your hair.
- Plastic/Latex Gloves: To protect your hands from bleach.
- Plastic/Glass Mixing Bowl: For mixing your bleach and developer.
- Shower Cap or Plastic Bag: To cover your hair after applying the bleach.
- Balancing Hair Shampoo & Protein-Balancing Hair Conditioner: To maintain the health of your hair post-bleaching.
- Old Towel & Clothes: Because bleaching can get messy!
- Toner (Optional): For those wanting to get rid of any unwanted brassy tones.
Your Step-by-Step Guide to Bleaching Your Hair at Home
Pre-Bleaching Preparations: Don’t wash your hair for 2-3 days prior. Set up in a well-lit, well-ventilated space. Lay out all your tools for easy access.
Suit Up: Slip into those old clothes and don the gloves.
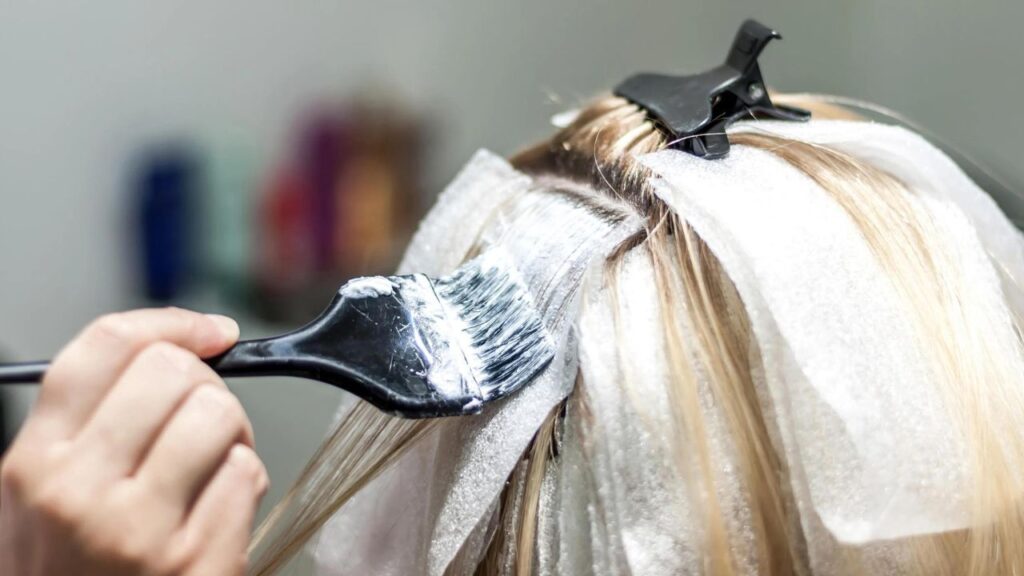
Section and Secure: Begin by sectioning your hair, keeping the crown part separate. This lets you tackle the more accessible sections first.
Concoct Your Bleaching Mixture: Mix your bleach and developer in the 1:2 ratio (one part bleach to two parts developer), ensuring it’s lump-free and smooth.
Let’s Bleach!: Begin by applying to the tips and mid-lengths, as these areas take longer to lighten. After around 20 minutes, move on to the roots for an even tone. Handy hint: Start with the lower sections of hair, leaving the harder-to-reach crown for last.
Shower Cap Time: Once you’ve covered all sections, pop on that shower cap or plastic bag.
Patiently Wait: Relax, perhaps sip a cup of tea, but don’t let the bleach sit for more than 30-45 minutes. Check intermittently. And don’t fret if you spot orange hues, especially if you have dark hair. It’s part of the lightening journey.
A Word of Caution: If you notice any redness, itching, or burning sensations, it’s time to wash the bleach off immediately and consider seeking medical advice.
Rinse & Nourish: After your wait, rinse the bleach thoroughly. Cleanse your hair with the balancing shampoo and follow up with the protein-balancing conditioner. Let your hair embrace the natural breeze and air dry.
Toner Time (Optional): For those averse to warm tones, using a toner post-bleaching can be a saviour. Alternatively, a toning shampoo can also help to neutralise those warm undertones.
And voila! With these steps, you’re all set on your DIY hair bleaching journey. For aftercare and maintaining your hair’s health post-bleaching, continue reading!
Essential Post-Bleaching Hair Care Tips
Bleaching is a harsh process that strips hair of its natural pigment, making it more porous and susceptible to damage. To maintain the integrity and health of bleached hair, it’s crucial to adopt a proper post-bleaching care routine. Here’s a comprehensive guide:
Minimise Conditioner Usage:
- After bleaching, hair becomes more vulnerable to chemical damage.
- Reduce the frequency of conditioning to once a week.
- When you do condition, avoid the scalp and use it sparingly.
Embrace Natural/Organic Products:
- Bleached hair needs gentle care. Opt for chemical-free, natural products to ensure the health of your locks.
- From aloe vera to yoghourt, there are plenty of homemade hair masks that can nourish bleached hair.
Avoid Heat Styling:
- Bleached hair is more prone to heat damage.
- Give your hair a break from straighteners, curling irons, and blow dryers for at least a couple of weeks post-bleaching.
Oil Treatments are a Must:
- Oils, especially coconut oil, are proven to penetrate the hair shaft and replenish moisture.
- Regularly oil your hair for deep nourishment and strength.
Dilute Your Shampoo:
- Straight shampoos can be harsh on bleached hair.
- By diluting it with water, you’re giving your hair a gentler cleanse.
Purple Shampoo is Your Savior:
- Bleached hair often develops brassy undertones.
- Purple shampoo neutralises these undertones, keeping your blonde/silver shade looking fresh and cool.
Bleaching Before Colouring
- Bleaching acts as a preparatory step before hair colouring, ensuring the colour seeps in better for a vivid and lasting result.
- If colouring at home, proper knowledge on bleaching is crucial. The right bleach, technique, and post-care will make all the difference.
Word of Caution
- Certain hair types are more vulnerable to the adverse effects of bleaching. If your hair is curly, extremely dark, long, chemically treated, thin, overly thick, kinky, dyed, permed, or brittle, it’s best to avoid at-home bleaching.
- Signs like scalp inflammation, redness, and stinging are indicators of a negative reaction. If such symptoms appear, consult a professional.
- When in doubt, always trust a professional. They can offer tailored advice and treatment based on your hair type and health.
In Conclusion
Bleaching is a transformative process, but it demands responsible aftercare. With the right products, practices, and patience, you can maintain the health and beauty of your bleached locks. Always prioritize hair health over aesthetic desires, and when necessary, seek expert advice.
Frequently Asked Questions
-
What hair color is most attractive?
Answer: The attractiveness of hair color is subjective and varies based on individual preferences, cultural influences, and current fashion trends. However, choosing a hair color based on your skin undertone and eye color can enhance your natural features. For instance, those with warmer shades like light brown eyes might find warmer hair colors like auburn or golden blonde complementary. Conversely, those with cooler-toned dark brown eyes might gravitate towards ash blonde, ombre, or burgundy hues. Medium brown and hazel eyes have the versatility to pull off both warm and cool tones.
-
Does light hair or dark hair make you look younger?
Answer: Typically, softer and lighter hair colors can give a youthful appearance as they might not emphasize facial imperfections as much as darker shades. Dark hair colors can accentuate fine lines, wrinkles, and other signs of aging. However, extremely bright or unnatural shades can also be harsh for mature skin. If you have brown eyes, light brown and cooler blonde tones can offer a rejuvenating effect. Pastel and gray shades can also be trendy choices that make brown eyes stand out.
-
Are brown eyes warm or cool?
Answer: The undertone of brown eyes can vary. Typically, dark brown eyes are considered cool-toned, while light brown eyes lean towards a warmer tone. Hazel eyes can be a mix; those with golden flecks are often warmer, while hazel eyes with green or gray flecks are cooler.
-
Are light brown eyes rare?
Answer: Brown eyes, in general, are common worldwide, with a significant portion of the global population having this eye color. This is especially true in regions like Africa and Asia. However, within the spectrum of brown eyes, light brown might be less common compared to deeper shades. Rarer still are hazel and amber eyes, which are distinct from typical brown due to their unique flecks and hues.
Remember, beauty standards evolve, and personal preferences play a huge role in determining what looks best on an individual. It’s always a good idea to choose shades and styles that make you feel confident and authentic to yourself.


